Beyond the Jar: Making Your Own Cultured Butter at Home

A baker pulls a tray of sourdough loaves from the oven, the crust crackling as it hits the cool air. They reach for a block of store-bought butter, but it feels flat—lacking that tangy, complex depth that matches the fermented grain. This is the gap between "standard" and "exceptional." Making your own cultured butter at home fills that gap by introducing lactic acid fermentation into your dairy, creating a product with much more character than anything found in a grocery store aisle. We’ll look at the science, the equipment, and the step-by-step process of turning heavy cream into gold.
Most people think butter is just fat and water. It is, but the flavor lives in the fermentation. When you culture cream, you're letting specific bacteria work their magic, breaking down lactose and creating those tiny, bright notes of acidity. It’s a way to level up your pantry without needing a massive kitchen overhaul.
What is the difference between cultured and regular butter?
The primary difference is that cultured butter undergoes a fermentation process where lactic acid bacteria are added to the cream before it is churned. Regular butter is usually made by simply churning cream until the fat globules separate from the buttermilk. Because the bacteria have had time to develop, cultured butter has a much more complex, slightly tangy, and even "nutty" profile.
Think of it like the difference between plain yogurt and Greek yogurt. One is straightforward; the other has a developed personality. If you've ever enjoyed a high-end crusty bread, you know that a piece of cultured butter is the only way to go. It’s a way to practice perfect homemade dough with a topping that actually stands up to the bread's complexity.
Here is a quick breakdown of the two:
| Feature | Regular Butter | Cultured Butter |
|---|---|---|
| Flavor Profile | Mild, creamy, neutral | Tangy, acidic, complex |
| Production | Direct churning of cream | Cream is fermented first |
| - | - | |
| Shelf Life | Standard | Slightly longer due to acidity |
How do you make cultured butter at home?
You make cultured butter by adding a starter culture to heavy cream, letting it sit at room temperature for a day or two, and then churning it into fat. It’s a slow process, but the patience pays off. You don't need a fancy machine; a glass jar or a stand mixer will do just fine.
First, you need high-quality heavy cream. I highly recommend using a cream that has a high fat content—look for brands like Land O'Lakes or any local dairy that provides organic, unhomogenized cream if you can find it. You want the fat to be at least 36%.
The Ingredients:
- 2 cups (approx. 500ml) of heavy cream (non-ultrapasteurized is best)
- 1-2 tablespoons of plain, unsweetened yogurt or a dedicated commercial starter culture
- A pinch of sea salt (optional, for finishing)
The Process:
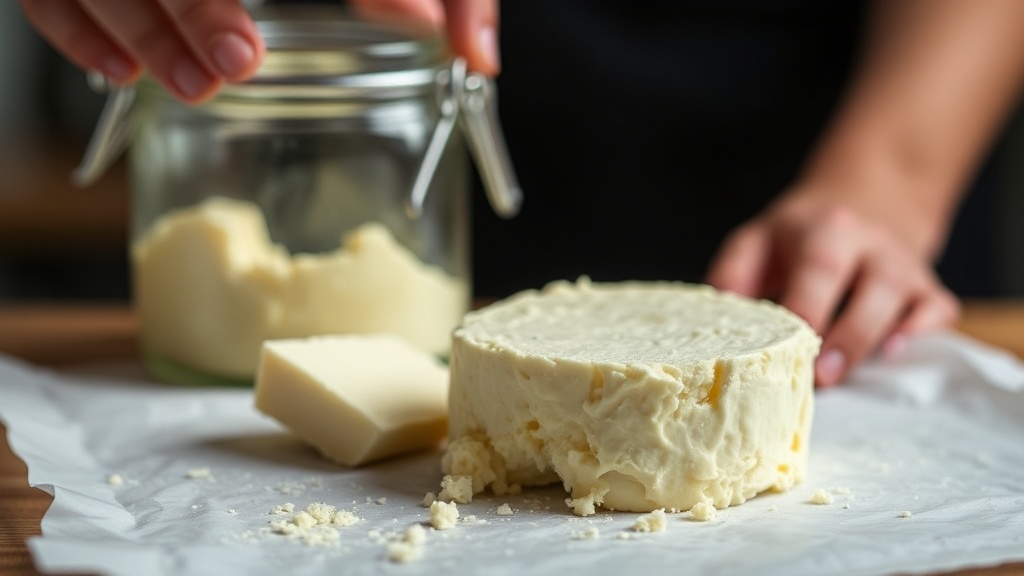
- The Fermentation: Pour your cream into a clean glass jar. Stir in your yogurt or starter culture. Cover the jar with a breathable cloth or a loose lid. Let it sit on your counter at room temperature for 24 to 48 hours. You're looking for a slight thickening and a pleasant, sour aroma—not a rancid one.
- The Churn: Once the cream has developed that tang, pour it into a stand mixer or a glass jar. If using a jar, shake it vigorously (get a workout in!) or use a hand mixer. You'll see the cream transform from liquid to a thick, foamy state, and then suddenly, the solids will clump together.
- The Separation: You'll see the "butter" separate from the "buttermilk." The buttermilk is the liquid left over. Don't throw it out! It's liquid gold for baking or pancakes.
- The Wash: This is the part people skip, but it's the most important step for longevity. Put the butter solids in a fine-mesh sieve. Pour in ice-cold water and knead the butter in the water. Repeat this until the water stays clear. If you leave buttermilk in the butter, it will go bad quickly.
- The Finish: Drain the butter, pat it dry with a clean cloth, and add your salt.
It's a bit of a tactile process. You'll feel the texture change from liquid to a grainy, solid mass. It's strangely satisfying to watch the fat separate from the liquid—it's one of those kitchen moments that makes you feel like a real chef.
What equipment do I need for making butter?
You can make excellent butter using basic kitchen tools you likely already own, such as a glass jar, a stand mixer, or even a hand whisk. There is no need to go out and buy a dedicated butter churn unless you're planning on making a massive amount of it.
If you want to be precise, a digital scale is a great addition. Measuring your cream by weight rather than volume ensures consistency. If you're using a stand mixer, the KitchenAid is the gold standard for this because the paddle attachment moves the cream around effectively without splashing too much. (Though, a warning: use a lid or a cloth to prevent a mess if you're using a jar method.)
The quality of your equipment determines your speed, not your success. You could make this with a mason jar and a lot of arm strength. However, having a high-quality whisk or a sturdy wooden spoon makes the "washing" stage much easier. You want to be able to work the butter through the water to get every last drop of buttermilk out.
If you're looking for a more professional touch, consider getting a small, fine-mesh sieve. It's much better than using a cheesecloth for straining the buttermilk away. It's a small difference, but it helps ensure your butter stays fresh longer.
The texture of your butter will depend heavily on the temperature of the water you use during the washing stage. Use ice-cold water. This keeps the fat from melting and helps the solids stay together while you're kneading them. If the water is even slightly warm, you'll end up with a greasy mess instead of a solid block of butter.
Once you've perfected your butter, don't let it just sit in the fridge. Use it on something that needs a bit of punch. A thick slice of toasted sourdough or even a warm bowl of grains can be transformed by a dollop of homemade cultured butter. It's a way to practice reimagining your daily grain base with a much richer flavor profile.
One thing to watch out for: the smell. During the fermentation stage, the scent should be mild and lactic. If it smells "off" or like rotting fruit, something went wrong. This usually happens if the cream wasn't high quality or if the room was too hot. Stick to a stable room temperature and you'll be fine.
A final tip: don't be afraid to experiment with flavors during the final stage. Once the butter is washed and dried, you can whip in fresh herbs, garlic, or even a bit of honey. This is where the real fun begins. You've gone from a consumer to a producer, and that changes the way you look at your pantry.