The Complete Guide to Perfect Sourdough Bread at Home

How Do You Make Sourdough Bread for Beginners?
Sourdough bread requires just flour, water, salt, and a living starter culture. The process spans several days, but most of that time involves waiting—not active work.
Start with a healthy starter. If you don't have one, King Arthur Baking offers a proven method using whole wheat flour and patience. The starter needs to double in size predictably before it'll leaven bread properly. This usually takes 5–7 days of daily feedings.
Once the starter's active, mix your dough. A simple formula: 500g bread flour, 350g water, 100g active starter, and 10g salt. The dough feels sticky. That's normal. Resist the urge to add extra flour.
Autolyse comes next—let the flour and water rest for 30 minutes to an hour before adding salt and starter. This step develops gluten without kneading. Some bakers skip it. Don't. The difference in oven spring is noticeable.
Stretch and fold the dough every 30 minutes for 2–3 hours. Wet your hands first (the dough won't stick as badly). Each fold builds strength. By the third set, the dough transforms from a shaggy mess into something smooth and elastic.
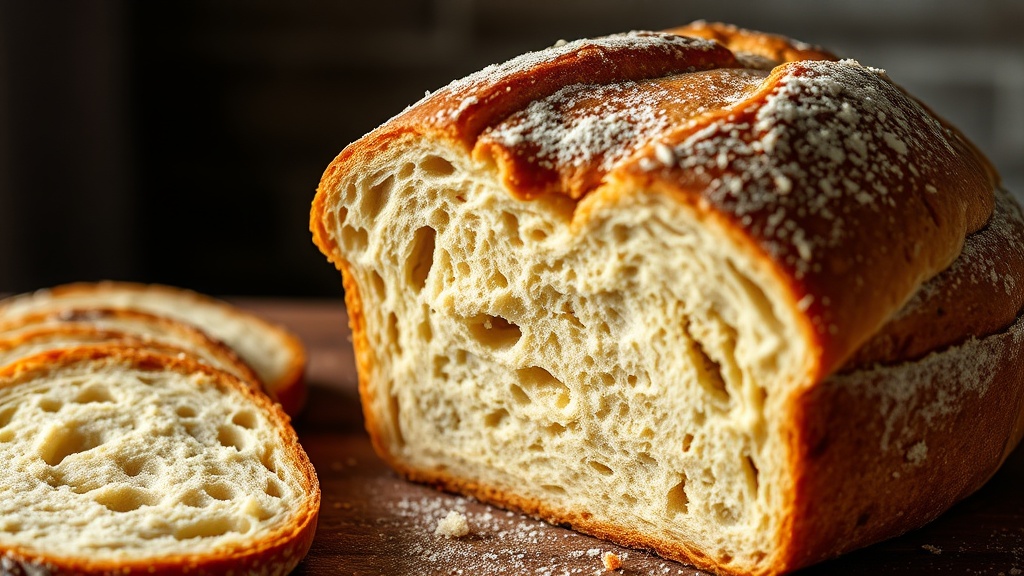
Bulk fermentation takes 4–12 hours depending on your kitchen temperature. The dough should look puffy, not necessarily doubled. The poke test helps—press a floured finger into the dough. If it springs back slowly and leaves a small indentation, you're ready for shaping.
What Equipment Do You Actually Need?
You need less than Instagram suggests. A digital scale, a Dutch oven, and a bench scraper cover 90% of sourdough baking.
The scale matters most. Volume measurements fail here—flour compacts, humidity varies. The OXO Good Grips Stainless Steel Scale costs around $50 and lasts years. Grams. Always grams.
A Dutch oven creates steam—critical for that crackly crust. The Lodge 5-Quart Cast Iron Dutch Oven works perfectly at $60. Le Creuset performs identically for five times the price. Your call.
| Equipment | Purpose | Budget Option | Upgrade Option |
|---|---|---|---|
| Digital Scale | Precise measurements | AWS Digital Scale ($15) | OXO Good Grips ($50) |
| Dutch Oven | Steam generation | Lodge Cast Iron ($60) | Le Creuset Signature ($350) |
| Bench Scraper | Dough handling | Ouddy Metal Scraper ($8) | Dexter-Russell ($25) |
| Banneton | Final proofing shape | Round bowl + tea towel ($0) | 9-inch Oval Banneton ($20) |
| Lame | Scoring dough | Sharp razor blade ($2) | WireMonkey Arc ($35) |
Bannetons (those coiled baskets) help loaves hold their shape during final proofing. A kitchen towel in a mixing bowl works too—not as pretty, but functional. The dough releases easier from linen than from cotton, though.
Scoring requires something sharp. A razor blade taped to a coffee stirrer beats most store-bought lames. The angle matters more than the tool—45 degrees for an ear, straight down for a simple slash.
Why Is My Sourdough Bread Dense and Gummy?
Underproofing causes 80% of dense sourdough problems. The dough needs time—cold kitchens slow fermentation dramatically.
Check your starter first. Does it double within 4–6 hours of feeding? If not, it's not strong enough. Feed it twice daily for a few days. Look for bubbles throughout, not just on top. The smell should be yeasty and slightly tangy—not acetone (that means it's hungry).
Temperature controls everything. At 65°F, bulk fermentation takes 12+ hours. At 78°F, maybe 4. The Perfect Loaf maintains excellent resources on temperature management. Here's the thing—most home kitchens fluctuate. Find the warmest consistent spot (top of the fridge often works) or use a proofing box.
Overproofing happens too. The dough collapses, turning into a pancake. It bakes flat with huge holes near the crust and dense crumb below. The finger poke test prevents this—springy means underproofed, no spring means overproofed, slow spring means just right.
Your oven might be the culprit. Home ovens lie about temperature. A $10 oven thermometer reveals the truth. Preheat your Dutch oven for at least 45 minutes—cold pots steal heat, preventing proper oven spring.
Cutting too early ruins even perfect loaves. The interior keeps cooking as the bread cools. Slice after 2 hours minimum. Overnight is better. The texture sets, the flavors develop. Patience—again.
How Long Does the Entire Process Take?
From mixing to slicing: 24–48 hours. Active time: maybe 30 minutes.
Day one involves mixing, folding, and bulk fermentation. Start in the evening, let it rise overnight (if your kitchen's cool), shape in the morning, proof for 2–4 hours, then bake. Or—shape and refrigerate for 12–24 hours. Cold proofing improves flavor and scoring (the dough firms up, making slashes cleaner).
Some bakers speed things up with warm water, proofing boxes, more starter. The bread suffers. Sourdough rewards slowness. Acetic acid (vinegar notes) develops in cool, long ferments. Lactic acid (yogurt tang) prefers warmth. Manipulate this through temperature choices.
Flour Selection: Does It Matter?
Yes—and no. All-purpose flour makes decent sourdough. Bread flour makes better sourdough. Whole grain makes challenging but flavorful sourdough.
Bread flour contains more protein (12–14%) than all-purpose (10–12%). That extra protein forms stronger gluten networks—taller loaves, chewier crumb. King Arthur Bread Flour performs consistently. In Canada, Rogers Bread Flour (found at Provigo and Metro in Montreal) works beautifully.
Whole wheat and rye add complexity. They also add difficulty—bran cuts gluten strands, making dough harder to handle. Start with 10% whole grain, increase gradually. Freshly milled flour (from Anson Mills or local millers) behaves differently than supermarket bags. It absorbs more water and ferments faster.
Ancient grains—einkorn, spelt, kamut—bring distinct flavors. Spelt creates tender, nutty loaves. Einkorn's sticky and requires technique adjustments. Worth trying once you've mastered basic white sourdough.
Storing and Reviving Your Bread
Never refrigerate fresh sourdough. The cold accelerates staling through starch retrogradation (bread science terminology for "gets hard and weird").
Store cut loaves cut-side down on a cutting board—exposed crumb dries, creating a natural seal. A paper bag inside a bread box works for 2–3 days. Plastic bags soften the crust into leather.
Slice and freeze for longer storage. Wrap individual slices or half-loaves in foil, then bag. Toast straight from frozen—no thawing needed. The crust crackles, the crumb warms through. Almost as good as day one.
Stale bread has uses. Pain perdu (French toast in Montreal's breakfast spots like Beauty's Luncheonette) demands day-old bread. Breadcrumbs, panzanella, ribollita—waste nothing.
"Sourdough is a journey, not a destination. Every loaf teaches something. The worst sourdough still beats store-bought."
Your tenth loaf will look nothing like your first. That's the point. The starter becomes predictable. Your hands learn the feel of properly developed dough. You'll recognize proper proofing by sight, not just by clock.
Montreal's hard water (average 116 ppm) actually benefits sourdough—minerals strengthen gluten. Local bakers at Guillaume and Arhoma have known this for decades. The city's bagel tradition (hand-rolled, wood-fired, honey-water boiled) shares roots with sourdough techniques.
Start this weekend. Mix the dough Saturday morning. Bake Sunday. By Monday, you'll understand why people obsess over fermented flour and water. The crust shatters. The crumb ripens. The flavor deepens with each chew. No other bread compares.